Web Forms
ASP.NET's Web Forms provide you with the ability to build Web-based GUI applications. Web Forms include Web pages (also called an ASP.NET page or web Forms page) and GUI components (sometimes called server controls) such as text boxes, buttons, list boxes, data grids, and so on. ASP.NET provides the flexibility to add these controls to an ASP.NET page at run-time as well as at design-time as well as at design-time. VS.NET provides design-time features to develop applications in no time. You add controls to a page by dragging controls from the toolbox to the page and then setting the controls' properties and event. Web Forms also provides a method for using the codebehind directive to separate your controls from the code. In other worlds you can write code in a separate file from the controls.
Web Service.
Web services are applications that perform a certain task; they can be used by a single application as well as distributed on the Web. I'll cover Web services in the next article.
Developing Your First ASP.NET Web Application
Before I discuss the ASP .NET model in more depth, I'll show you how to develop your first ASP .NET application. In this example, I'll create a simple Web application using VS .NET. Similar to your first Windows application, I'll add a button, a text box, and a list box control to a Web page and then add text box contents to list box on the button-click event.
Creating a Web Application Project
Creating a new ASP.NET Web application using visual studio.NET is simple. First create a new project using File > New > Project > visual C# project and then select the ASP.NET Web Application template (see figure 7-1).
Figure 7-1. The First Web Application project
The Location box will show you the default of http://local and the application name. Here localhost represents the default IIS server running on your local machine. The default virtual directory for localhost is C:\Inetpub\wwwroot. If you're using a Web server installed on a network rather than your local machine, you need to use that server name. If you don't know the server name, you may want to contact your Web Server administrator. As you can see from figure 7-1, I'm using the MCB network Web Server. So if you see the name "MCB," don't worry. Just replace it with your own server's name. You can type either http://servername//application name or//server name//application name; both formats are correct.
Clicking the OK button a new directory, FirstWebApplication, in the server's virtual directory. It also creates a new Web application and sends you to the default WebForm1.aspx page, as shown in figure 7-2.
Figure 7-2. Default web Form1.aspx page
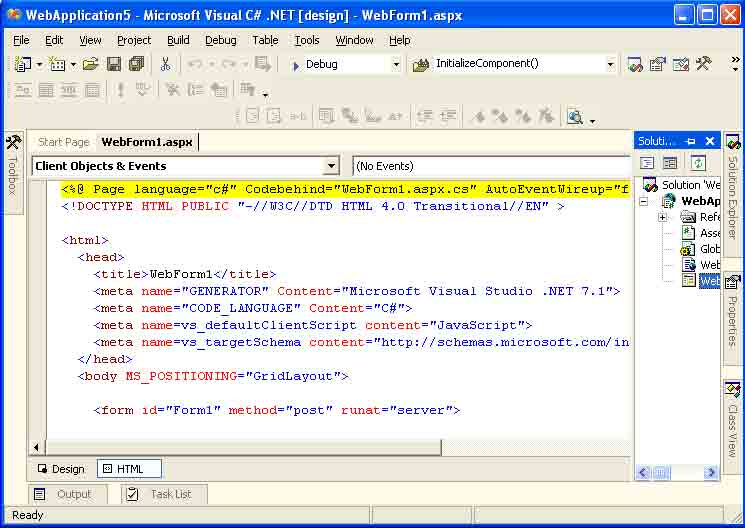
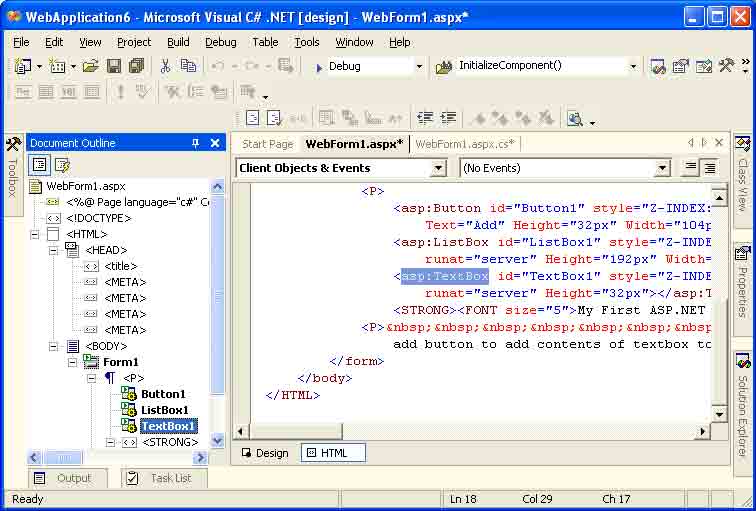
From here you can edit your page's HTML. As you see in left-button corner of figure 7-2, there are two modes available: Design and HTML. Click the HTML button to edit the code, as shown in figure 7-3.
Figure 7-3. HTML view of web Form1.aspx
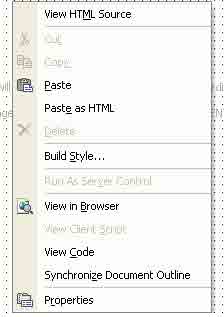
The HTML view shows you the HTML code of a page, its controls, and control properties. The HTML editor also lets you edit the HTML manually. Now if you switch the page view back to the design mode and right-click on Browser, View Code, Synchronize Document, and so on (see figure 7-4).
Figure 7-4. An ASP .NET page's right-click options
You can set a page's properties by selecting properties from the right-click menu. The properties menu opens the Document property pages window. As you can see from figure 7-5, there are three tabs available in the properties window: General, Color and Margins, and Keywords. Most of the properties are self-explanatory. On the General tab, the page Layout property has two options, GridLayout and FlowLayout. GridLayout is when you want drop controls to the page and reposition them. If you want to add text to the page, you should set the page layout to FlowLayout; other wise you won't be able to add text to the page. After setting the page layout property to flow Layout, the editor works as a text editor.
Figure 7-5. An ASP .NET document's page properties
Adding Web Controls to a Web Form
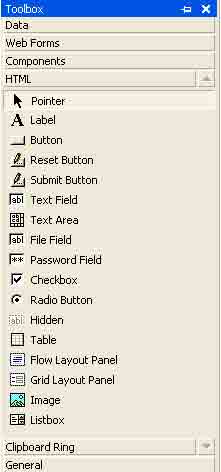
Similar to the Windows control toolbox, VS.NET provides a Web Forms control toolbox. You can open the toolbox by selecting the View > Toolbox main menu item. The web Forms toolbox looks like figure 7-6. The Web Forms category of the toolbox contains form controls and the HTML category contains HTML controls. The Data category provides the same data components you've seen in the Windows application toolbox. It has the same connection, data adapters, datasets, data views, and DataViewManager components. Figure 7-6 and 7-7 shows the Web Forms and HTML controls, respectively.
Figure 7-6. Web Forms controls
Figure 7-7. HTML Web Controls
For the application in this article, I'll be using the Web Forms controls. OK now switch the page back to the Design mode and GridLayout mode (if you changed its modes) and add a button, a text box, and a List Box to the form by dragging these controls from the Web Forms toolbox to WebForm1.aspx. The page should now look like figure 7-8.
Figure 7-8. WebForms1.aspx Design mode after adding Web Forms controls
Setting Control Properties
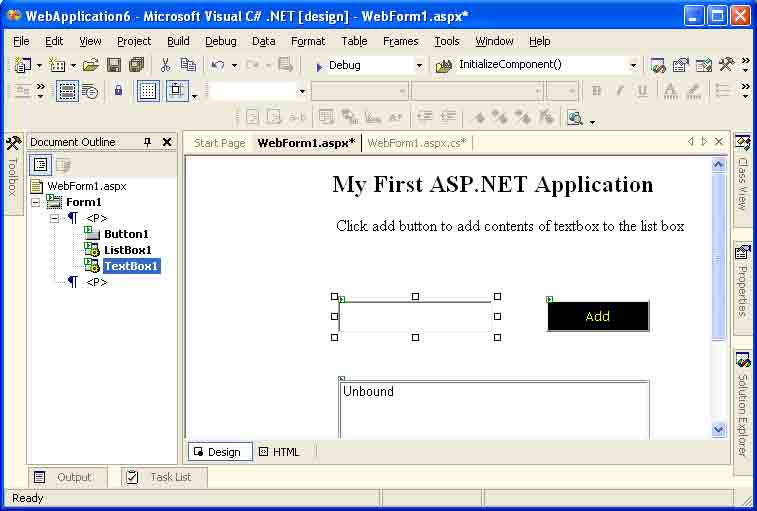
The next step is to add some text to the page and change some of the control's properties. To add text to the page, first you need to change the page layout to FlowLayout in the properties windows, which you can do by right-clicking on the page and selecting properties. Now add a heading to the page. I added two lines to the page and set a different font and font size for these lines. The first line text is "My First ASP.NET Application," and the second line text is "Click Add button to add contents of text to the list box." I also set some properties of the button and text box controls (see figure 7-9).
Figure 7-9. Properties window for the Web controls
Specifically, I changed the border, background color, font, and fore ground color of these controls. As you can see, changing these properties is similar to changing them for Windows application. The final page with these properties looks like figure 7-10.
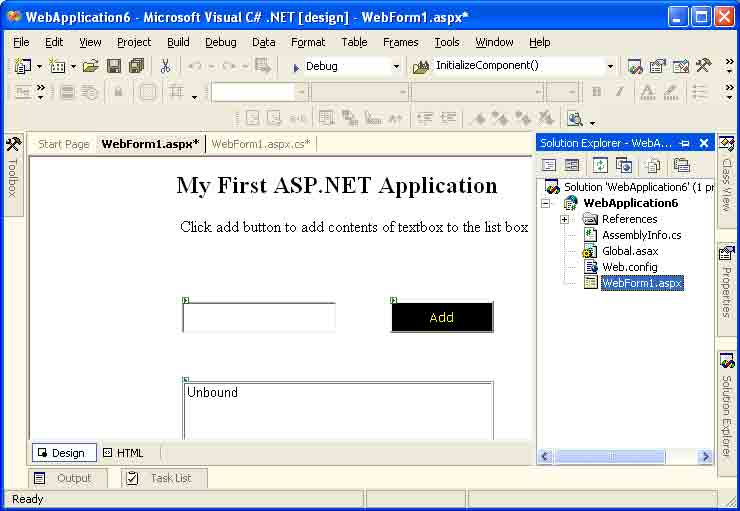
Figure 7-10. Final page of the Web application after changing some control properties
Using Document Outline
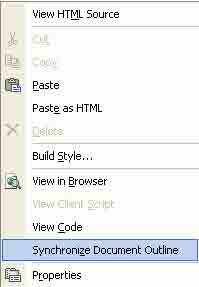
Another nice feature of the visual Studio.NET IDE is that you can synchronize a Web page's controls with its contents in the Document outline viewer. This is really useful when you're developing a Web application with hundreds of controls; it can be hard to keep track of all the controls, HTML tags, and other page contents. The Document Outline viewer enables you to manage a page's contents in a tree format. The tree format displays all the page elements in the order they're called in the page. You can open the Document outline viewer by right-clicking on a Page and selecting Synchronize Document Outline (see Figure 7-11).
Figure 7-11. Calling the Document outline viewer
This action launches the Document outline viewer in the left pane (see figure 7-12). As you can see, the tree view displays the page contents, including the form, button, text box, and paragraph. If you click on a control in the Document Outline Viewer, it selects the corresponding control in the form. And vice versa, if you select a control in the form and make Document Outline the active window, the viewer selects that control in the tree view.
Figure 7-12. Document outline viewer
You can also use the Document Viewer's right-click menu to cut, paste, delete, view the code, and view the properties of these controls (see figure 7-13).
Figure 7-13. Document outline viewer's right-click options
Not only that, but now I'll show you one more thing. Select the HTML view of your page, and you can move to specific HTML tags using the Document Outline viewer. As you can see from figure 7-14, the tree view displays all the code of an HTML page in a nested structure as they're organized in the original code.
Figure 7-14. HTML view of Document Outline
So, the point is that you can find and organize your HTML code and controls from the Document Outline viewer instead of looking for a tag in the file manually.
Writing Code on the Button-Click Event Handler
The last step of this tutorial is to add an event handler for the button and write code to add some text box text to the list box. You add a control event similar to Windows applications. You can either double-click on the button or use the properties window's lighting icon to add an event. I'll add the button's click event as Button1_Click (see figure 7-15).
Figure 7-15. Adding an event handler to the button-click event
This action adds the Button1_Click method to the Web Form1.aspx.cs class, which hosts the code for the page controls and events. Now write a line of code to add the text box contents to the list box. Specifically, add the bold line in Listing 7-1 to the Button_Click method.
Listing 7-1. Adding the text box contents to the list box
private void Button1_Click(object sender, System.EventArgs e)
{
ListBox1.Items.Add(TextBox1.Text.ToString());
}
Note: You can also see the code using the View Code option of the page's right-click menu.
Now compile and run the project. The output of the program looks like figure 7-16 Clicking the Add button adds the text box contents to the list box.


No comments:
Post a Comment